Background
Sunday, March 10, 2013
Wedding Shower Gift Plaque
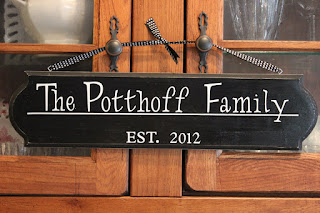
My husband's cousin got married, and I made her one of those name plaques that are all over Etsy for $35-$60. The final cost of project was about $15, with some extra supplies for other plaques or crafts.
This is a super easy and cute project!
You'll need:
1 wooden plaque
any color acrylic paint (I used black)
sticky back vinyl for the Cricut (I used white)
Modge Podge
paint sponges
X-acto knife or rotary cutter
chalk and measuring tape
medium fine sandpaper
2 of those small rings that screw into the top (obviously don't know the technical name, see picture)
pliers
hammer, or heeled shoe :)
1. Paint the plaque. Let dry. Paint another coat. Let dry.
2. Sand the edges of the painted plaque for that distressed look.
3. Cut out the letters you need onto the vinyl. I made the first capital letter a 1/2 inch bigger than the other letters so they would stand out. I used two different fonts to cut out the letters. For the name, I used Lyrical Letters, and for the date I used Plantin' Schoolbook.
4. Don't take the letters off the backing yet.
5. For the line, cut a strip of vinyl using your X-acto or rotary cutter. I made mine longer than the plaque. Place it carefully in the middle of the plaque. Use X-acto to cut the length as desired on each side.
6. Place all of the letter exactly where you want them using the vinyl strip as a guide. Use a measuring tape to make sure each side is the same size. Do the same with the date at the bottom.
7. Once you are perfectly happy with the placement, take your chalk and make a mark on the side of each letter so that you can line it back up.
8. Carefully take the backing off each letter and place it in its spot.
9. If it looks wrong in any way, this is the time to adjust it!
10. When you are happy with it, take the Modge Podge and cover the entire visible surface of the plaque.
11. Let dry.
12. Take your hooks and attach them to the top of the plaque. I had to hammer them in first, then screw them in using my pliers. Make sure they are equidistant from the sides.
13. Attach your coordinating ribbon. I threaded it through each hook and then made a knot at the top.
14. If you want to keep your ribbon from fraying, just take a lighter and carefully singe the ends of the ribbon.
Here is the final product!
Subscribe to:
Post Comments (Atom)


Love this!
ReplyDeleteJust perfect because I was invited to a wedding that will be held next month. I think that this is a great gift that the couple will surely love. Simple but very memorable as it came from the heart. :)
ReplyDelete- TheBestofChimes.com
I encountered another plaque of similar design this week and it made me think how special it is for families to have as a remembrance. Think I'll try making one for my friend's family. :)
ReplyDelete- TheBestofChimes.com